OAuth History and Structure
OAuth, or open authorization, is a widely adopted authorization framework that allows you to consent to an application interacting with another on your behalf without having to reveal your password.
The main purpose of this protocol was to enable users to define user credentials to a central system/application (for example, Google) and to enable other applications using this protocol to perform relevant transactions using only the necessary information of the users.
In this way, ,OAuth 2.0 was filled the missing Authorization part of the OpenID protocol with a token based structure. Then, Later an identity layer called OIDC (OpenID Connect) developed on the OAuth 2.0 Framework was added and thus Authentication processes were defined within a standard.
OAuth 2.0 Structure

In the above picture, you can see the base structure of OAuth 2.0.
- In the most basic sense, when we as a user (Resource Owner) want to access our own data, we enter the relevant website (Client) and send a request to the relevant URL. The relevant website communicates with the Authorization Server to query whether we have access to that resource. As a result, the relevant server indicates that we have authorization. We reach the information we want to access as a result that returned by the Resource Server.
- OAuth 2.0 offers different types of Authorization Flows according to different usage conditions and these flows are named as follows.
- Authorization Code Flow
- Implicit Flow
- Resource Owner Password Credential Flow
- Client Credential Flow
1-) Authorization Request
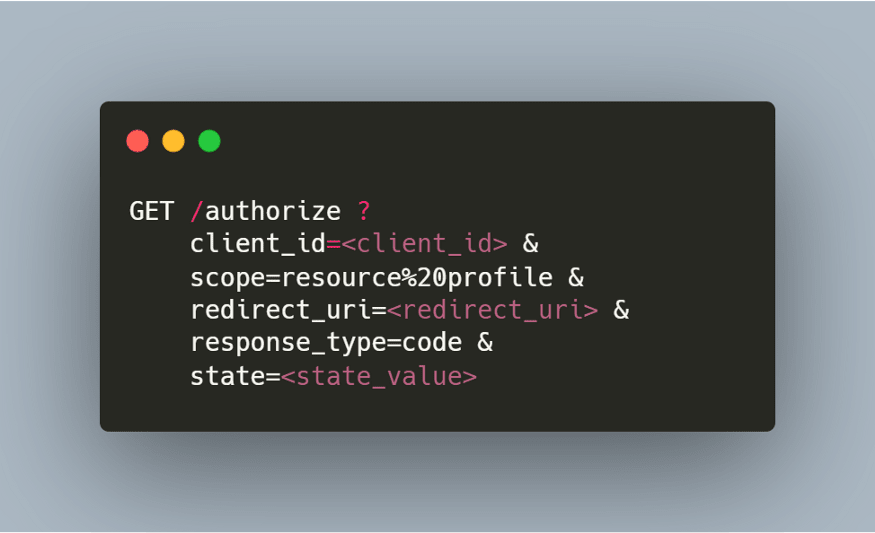
If we examine the related request, we can see that we passed a query parameter named "client_id". This "client_id" represents our application defined within the OAuth 2.0 protocol. In other word, it's a value that identifies the relevant application. The "scope" parameter specifies the scope of the relevant authorization. In other words, the user is only allowed to see the relevant information in the
resourceandprofilescope above. User can't access any other part of the application (e.g. delete contact) by using the generated token."Redirect_uri" represents the URL where the application we are using will get and use the relevant token.
The most important parameter here, the "response_type" parameter, shows which flow the request will be made with. (“code” for Authorization Code Flow)
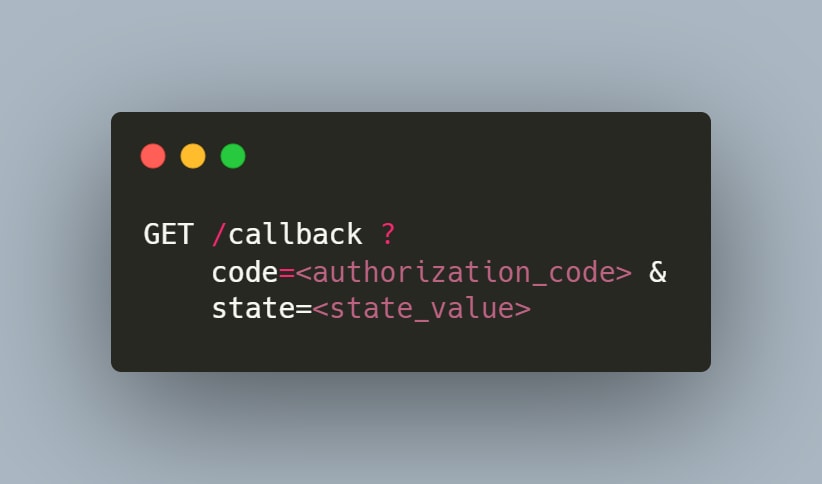
2-) Authorization Response
After the Authorization Server ensure that the relevant request is valid and in the correct format as well, it sends a GET request with the Authorization Code to the relevant callback url (redirect_uri) specified in the request.
3-) Token Request
After obtaining the Authorization Code, a token request is made by using the relevant Authorization Code to obtain a Access Token. (Token exchange => Authorization Code ↔ Access Token)

- As can be seen in this request, Authorization Code is specified as the
grant_typeand if this request is successful Authorization Server redirects us to the route specified in the "redirect_uri" parameter.
4-) Token Response
If the "Token Request" we made in the third step is successful, a similar response returns as below and can be used by the Client (the application we want to use).

Now, with this "access_token" the user can access its own data from Resource Server through the Client.
Here, if the "refresh_token" is also returned as a result of the request, when the "access_token" expires, a request can be made to renew the related "access_token" with this token


Comments
Post a Comment